
Recently, many friends said that the Shandong Unicom version of the contract IPTV can not break, is now released crack tutorial, thanks to Zibo Longmen education Cheng teacher box test.
Brushes are risky and need to be cautious. For example, the authors are irresponsible for the loss caused by the following operations. You can use the brush to get back to you, or you can enter REC mode and choose to recover.
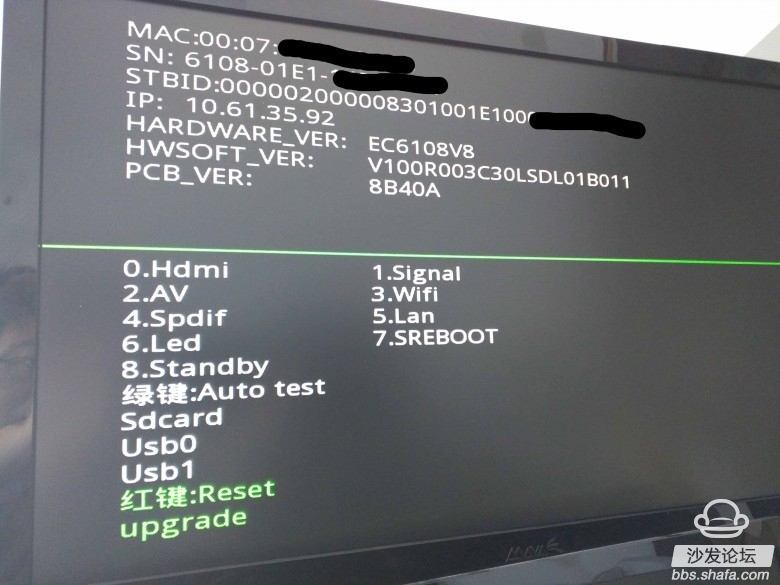
Hardware version: EC6108V8U
Because there is no other machine test, so please first confirm the version undefined other friends please provide the firmware)
The release version is "HMT V100R003C30LSDL01B011", and the hardware version is "EC6108V8U_pub_sdllt", system version: Android 4.2.2 (thanks to Cheng).
The release version is "HMT V100R003C30LSDL01", and the hardware version is "EC6108V8U_pub_sdllt", system version: Android 4.2.2 (thanks to Poe Xiao Mo for providing the test).
And your HDMI Cable is not switched to DVI or VGA, otherwise there is a place you need to touch the black operation.
1 find a U disk, formatted into FAT32 format, the compressed package Alpha_script.zip file unzip on the U disk root directory (Open the U disk you can see rootv9a.sh, rootv9.sh, Alpha_script.sh, root directory).
2 Insert the U disk into the USB port next to the network cable and enter the set-top box. Click "Settings"--"More" in the upper left corner of the remote control and select "Advanced Settings". At this time, you will be asked to enter the operation code "10010" and then " "OK", then click "Equipment Test". At this time, enter the password "131022", "Restart to production test"
3 restart to enter the Unicom Logo interface (if you are the interface as shown in Figure 1 below, that does not support this method to crack, can only crack with TTL lines, continue to resume the normal start at the following step 45), the program runs in the background, this To wait, it is estimated that it will not exceed 1 minute. After the program is finished, it will be that interface, so you don't have to wait for the screen. After a minute, press the power button to turn off and unplug the U disk.
4 At the same time, the remote controller of the boot set-top box is aligned with the set-top box, and the “Shutdown†button of the “remote control†button (button in the upper right corner) is kept pressed. After about half a minute, “1. Apply update from external storage†page appears. (Those students who use HDMI to DVI cable: If the screen is always a black screen, then you have succeeded, you can continue the following operation, if the Unicom LOGO shows failure to enter the rec mode, you need to repeatedly press the remote control operation)
5 students with blank screen, press the "down" button on the remote control, press several times more, it must be more than 6 times, in order to be on the safe side, press 10 times and nothing will happen, then press "OK" in the middle. You can see the interface of REC mode. Students, choose "6 reboot" reboot on it. Wait for the restart, there is the root and RE Manager.
Hardware version: EC6108V9A with equipment test mode released version: "HMT V100R003C60LSDL01", software version: B014, hardware version: "EC6108V9A_pub_sdllt", system version: Android 4.4.4 (thank you Yingnian Zaobianjun, Lee provides box extraction firmware and testing Thanks for jcwpbb feedback, the tarball has been updated at 10:56:12 on June 3, 2015, and is not a reliable notepad.)
1 find a U disk, formatted into FAT32 format, the compressed package Alpha_script.zip file unzip on the U disk root directory (Open the U disk you can see rootv9a.sh, rootv9.sh, Alpha_script.sh, root directory).
2 Insert the network cable (be sure to use network cable, wireless does not work), insert a good U disk, enter the set-top box, point the upper left corner of the remote control "Settings" - "More", select "Advanced Settings", this time will It is required to input the operation code "10010", then "OK", then click "Equipment Test". At this time, it is required to input the password "131022" and "restart to enter the production test".
3 restart into the color bar interface, connect the box and computer with a network cable, set the computer ip to 172.16.20.2, and then execute telnet 172.16.20.14 on the computer (some computers may not have telnet, then download a putty, open the choice telnet, Fill in ip and click open.) After entering, you will see the prompt "root@rk312x:/"
Execute one by one (one command per line, pay attention to the space), if the prompt "Device or resource busy" or "No such file or directory" appears
Mkdir -p /tmp/udisk mount -t vfat /dev/block/sda1 /tmp/udisk mount -t vfat /dev/block/sda /tmp/udisk mount -t vfat /dev/block/sda4 /tmp/udisk / Tmp/udisk/rootv9a.sh
[color=rgb(51, 79, 103) !important]Copy Code
The box will restart automatically.
4 If there is no automatic restart, manually shut down and restart. After restarting, there will be root and RE manager.
Hardware version: EC6108V9A Without equipment test mode thanks to hurry brother to provide box test.
1 Prepare a dual male USB cable, U disk, network cable, non-win10 system, if you are Linux, please contact me individually.
2 Unzip in the attachment package v9a-loader-dev-tool.zip, install DriverAssitant_v4.2 loader mode driver, run AndroidTool_Release_v2.35
Do not plug in the box Power Supply, directly connected to the usb computer plug close to the audio port of the usb port, while plugging in, keep pressing the remote control's home button.
Until the picture (in the compressed package), found a loader device, point execution, and then restart into the equipment test mode, the color bar interface (do not mess with other, may become brick).
3 find a U disk, formatted into FAT32 format, extract the Alpha_script.zip file on the U disk root directory (Open the U disk you can see rootv9a.sh, rootv9.sh, Alpha_script.sh, root directory).
4 network cable connection box and computer, set the computer ip to 172.16.20.2, and then execute putty-telnet 172.16.20.14 on the computer (download putty, open select telnet, fill in ip, point open on it). After entering, will see To the prompt "root@rk312x:/"
Execute one by one (one command per line, pay attention to the space). If the message "Device or resource busy" or "No such file or directory" appears, it can be ignored.
Mkdir -p /tmp/udisk mount -t vfat /dev/block/sda1 /tmp/udisk mount -t vfat /dev/block/sda /tmp/udisk mount -t vfat /dev/block/sda4 /tmp/udisk / Tmp/udisk/rootv9a.sh
[color=rgb(51, 79, 103) !important]Copy Code
If successful, the box will automatically restart.
5 If there is no automatic restart, manually shut down and restart. After waiting for the restart, there is the root and RE manager.
Hardware version: EC6108V9 EC6108V9U
1 find a U disk, formatted into FAT32 format, the compressed package Alpha_script.zip file unzip on the U disk root directory (Open the U disk you can see rootv9a.sh, rootv9.sh, Alpha_script.sh, root directory).
2 Insert the network cable (be sure to use network cable, wireless does not work), insert a good U disk, enter the set-top box, point the upper left corner of the remote control "Settings" - "More", select "Advanced Settings", this time will Request input operation code, mobile version is "10086", telecommunication version is "10000", Unicom version is "10010", then "OK", then click "equipment test", this time requires to enter the password "131022", "restart Enter production test"
3 After the restart, a black screen appears. Connect the network cable to the box and the computer. Set the computer ip to 192.168.1.2. Then execute telnet 192.168.1.1 on the computer. (On some computers, there may be no telnet. Then download a putty, open the option telnet, and fill in Ip, point open on it.) User name is root password is empty, you will see the prompt "Welcome to HiLinux.
""
Execute one by one (one command per line, pay attention to the space). If the message "Device or resource busy" or "No such file or directory" appears, it can be ignored.
Mkdir -p /tmp/udisk mount -t vfat /dev/sda1 /tmp/udisk mount -t vfat /dev/sda /tmp/udisk mount -t vfat /dev/sda4 /tmp/udisk /tmp/udisk/rootv9. Sh
[color=rgb(51, 79, 103) !important]Copy Code
The box will restart automatically.
4 If there is no automatic restart, manually shut down and restart. After waiting for the restart, press the Home button (multiple presses) to see the sofa table.
TIPS:
1. After cracking, enable the adb shell step. (Adbd should now be enabled by default after hacking)
Open Root Explorer, find / sbin / adbd, open the way to select "Linux script processor" - select "execute" (If you request root privileges, select "Allow", this will prompt all the time, no reason), - Remote "Settings", - Find your ip in "Network Settings", then "Back" --- "More" --- "Remote Maintenance Connection", change to "Allow"
Then you can link with adb connect ip
2, EC6108V8U/V9 students, equipment testing mode will enter HiLinux, V8U ip is 192.168.1.99, V9 ip is 192.168.1.1, open telnetd service, root login password is empty.
The command to start FTPd is
Tcpsvd -vE 0.0.0.0 21 ftpd -w /
[color=rgb(51, 79, 103) !important]Copy Code
/dev/mmcblk0p14 is the system partition, /dev/mmcblk0p12 is the backup partition of the REC mode (it is not recommended to tamper with, otherwise the system will not be restored if the kernel is not restored)
3, EC6108V9A students, equipment testing mode will enter rk312x, ip is 172.16.20.14, open telnetd service, no user name and password.
4, out of the equipment test mode is: boot at the same time, mad press the remote "standby" button until the Recovery interface (select 1-6 interface), select 6 reboot on it
5, using HDMI to DVI cable may be a black screen, and other boxes can start up and plug it.
6. Running SuperSU will prompt whether to update the binary file, select No
7, modify the network card MAC (non-wireless network card) For example, your network card MAC is 54:93:59:26undefinedD:E5, want to be modified to 54:93:59:26undefinedD:E0 (this is limited, not free to change , Do not understand do not change) into the adb shell or shell under test mode
EC6108V8 EC6108V8U EC6108V9 EC6108V9U
Sed -i 's/\x54\x93\x59\x26\xDD\xE5/\x54\x93\x59\x26\xDD\xE0/' /dev/mmcblk0p4
[color=rgb(51, 79, 103) !important]Copy Code
EC6108V9A
Sed -i 's/\x54\x93\x59\x26\xDD\xE5/\x54\x93\x59\x26\xDD\xE0/' /dev/block/platform/1021c000.rksdmmc/by-name/deviceinfo
[color=rgb(51, 79, 103) !important]Copy Code
Crack file download
Alpha_script.zip update log:
2015.10.23 Fixed an error in rootv9.sh
2015.10.23 Added EC6108V9/V9U ​​support, v9 and v9a enabled adbd by default
2015.10.1 update without equipment test mode method
Sony is a great brand for the laptops, and there are very few laptop manufacturers that compete with Sony when it comes to the style and aesthetics of their laptop designs. As a result, Sony has one of the most loyal customer bases within the laptop and Laptop Charger.
For sony laptop charger, the best seller is sony vaio lapotp charger. Yidashun can offer a full brand OEM replacement laptop Adapter for sony. The common Sony laptop charger specification has 60W 64W 16V, 39W 76W 80W 100W 120W 150W 19.5V etc, and the dc tip has common 4.8*1.7mm and 6.5*4.4mm with pin inside.
All our sony vaio adapter is Brand New Replacement Product, works as Genuine parts, 100% OEM Compatible!! and Our laptop adapter with smart IC can protect your laptop with over current protection, over load protection, short circuit protection and over heat protection.


Sony Laptop Charger,Sony Vaio Charger,Sony Vaio Laptop Charger,Sony Laptop Adapter
Shenzhen Yidashun Technology Co., Ltd. , https://www.ydsadapter.com