Last week, Google launched "Google Earth VR" and received a lot of praise from users, but it is a pity that this application is an exclusive application for htc vive.
Previously, the foreign media UploadVR tried to contact the relevant person in charge of Google to find out the situation and got a reply from Mike Podwal, project manager of Google Earth VR: "We must ensure that every game platform that Google Earth VR logs in can provide users with the most Good VR experience, so please be patient."

In the "Google Earth VR" on the SteamVR only one day, the hacker will modify the program to "Google Earth VR" compatible with the Rift head display and touch handle, and even compatible with the Razer Hydra sensor.

Given that SteamVR technology is already supporting Rift, hackers have made Rift heads mandatory to be compatible with Google Earth VR. A hacker named Shockfire7 on the Reddit social news site wrote a FakeVive file that could be used to trick SteamVR into thinking that Rift is a Vive, so that Google Earth VR is compatible with Rift.
FakeVive is a DLL file that needs to be placed in the "Google Earth VR" folder to believe it is connected to a Vive. It is not a reverse activation or other means, it just intercepts the execution of the OpenVR header request message and the spoof code. I don't want it to be more complicated than this, because SteamVR already supports Rift well.
FakeVive doesn't involve modifying any files in the app, so it's not just for Google Earth VR. This also makes it easier to install, even after the update (as long as the header does not add more complex detection) can still continue to run.
In addition to Rift, FakeVive hackers also make Google Earth VR compatible with Touchu handles and even Razer Hydra sensors.
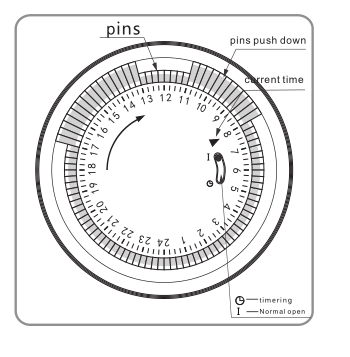
24 hours mechanical Timer
Instant indicator
Min.setting time:15 minutes. Max.setting timer:24 hours
With hand switch,can be switched to operating and
setting at any time
Instructions:

1. Set program: 1 pin is equivalent to 15 minutes. Determine desired start time and push down pins until desired
off time.
For instance, if you want electrical devices to work from 8:00am to 11:00am and from 13:00pm to 17:00pm, you
just need to put down allthe pins between the three period time.
2. Set the current time: Turning the dial clockwise until the arrow pointing to
current time.
For example,if now it is 8:00 am, please turn the dial and make sure the
arrow point to 8. (See the picture.)
3. Plug the electrical device directly into the timer. Make sure the electrical
device is power-on.
4. Plug the timer into electrical outlet and the electrical device will be work
according to the setting program.
Note: = Normal Ope n = Timing
Make sure the switch on the Timing position. If it
is on the [Normal Open" mode, the electrical device is
always power-on and the timer function no work.
Specifications:
|
Rated Voltage, Current and Power |
As shown on the label |
|
Time Setting Range |
15minutes24hours |
|
Working Temperature |
-10℃?+55℃ |
|
Operation |
Clockwise |
|
Insulation Resistance |
>100M |
|
Inherent Loss |
≤1W |
Application:
1. To enable high-power electric appliances to run automatically at off-peak time if there is different electricity
price according to different periods of time in some areas.
2. To use for electric appliances which need time control, such as water heaters, air conditioners, drinking
fountains, rice cookers, advertising lights and so on.
3. To control the charging time. For example, battery of electric bikes or mobile phones, storage batteries, etc.
4. Occasions which need switch on/off frequently, like interval spray irrigation for flowersand lawn, cyclical
adding oxygen to fish jar, fountains and so on.
5. Home safety precautions and lighting.
Caution:
1.D o not exceed the maximum ratings of the timer.
2.M ust reset the current time after power failure.
3.D o not plug the timer directly into the working electrical appliances.
4.U nless changing the setting, keep the program same every day.
5.D o not disassemble timer by yourself. Professionals service are needed for maintenance.
6.T his item is only for indoor use.
Mechanical Timer, mechanical timer socket, 24hr mechanical timer, mechanical timer plug, mechanical timer adaptor
NINGBO COWELL ELECTRONICS & TECHNOLOGY CO., LTD , https://www.cowellsocket.com
